
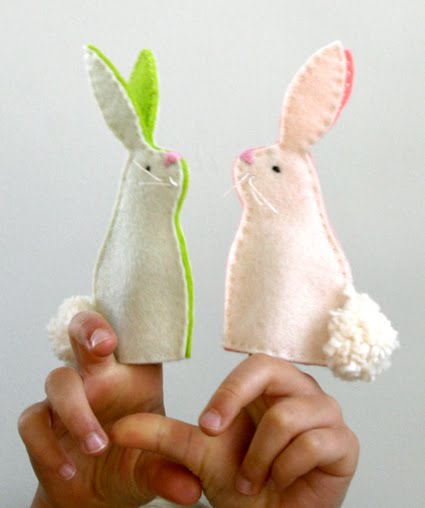
They are so easy to make, Im definitely going to get sewing this week to make a couple for Lola.
Aimee has done so well while we have been away in Portugal, looking after the mail order side of things and generally keeping it all going. I came back so inspired after a mammoth soap make with my mate Shelly. We made 300 bars of rose bud soap for a ladies only Portuguese night out, it was their 25th anniversary so a bit special and they wanted something pink and lovely to give as gifts. It was our first big Portuguese order, hopefully the first of many. Anyway, sorry for being so lax with the blog lately, just came back to so much work I had to get on top of that first. By the way, just to let you know, click on the facebook link on this page to find out about my latest offer for facebook fans, worth it if you like bubbly goats milk soap.
So get sewing guys! speak again soon.
Cutting

Using the template cut two bunnies from the white felt and two from one of the bright colors.
Sewing

Sandwich all four pieces together with the two white pieces on the outside and the two bright pieces inside. Pin them together.
Starting at a bottom corner sew through all four layers right along the edge with a small running stitch.

Sew in this manner along the first side stopping at the base of the ear.

Divide the felt into two ears each consisting of two layers of felt (one white and one bright color). Sew through only the first ear along it's edges. Leave the other ear unsewn for now.

Resume sewing through all four layers of felt once you get back to the head of the bunny as shown above.

Keep sewing in this manner until you get to the bottom edge of the body.

Open up the bottom of the shape so the bright felt is on the inside of the opening. Sew through only two layers (the white and the bright felt) of the bottom edge of the puppet. Then continue on sewing along the opposite side through just the other two layers. This will form the finger opening.

Once you're done sewing the body sew the second ear together along the perimeter with a small running stitch.

The Bunny's body is now done and ready to be embroidered.
Embroidering the Face

Draw a face on the bunny as shown on the template.

Using the pink embroidery thread and a satin stitch embroider the nose.

Embroider the eye with a couple of back stitches.

To make the whiskers: Tie a little knot leaving an inch long tail in the cream embroidery thread. Pull the thread though one of the whisker markings.

On the opposite side wrap the thread once around the needle. Pull the needle through this wrap, forming a small French Knot, and then trim the embroidery thread.

Repeat this for the two other whiskers and trim them so they are all about the same length.
Spray the puppet with water to get rid of the fabric marker markings.
Making the Pom Pom

Wrap the cotton yarn around two of your fingers several times.

Pull this gathered yarn off of your fingers and wrap the yarn around the middle of this gathering tightly and tie a little knot.

Cut the loops to form a pom pom.

Trim the pom pom so it's fluffy and round.

Using the cream colored embroidery thread sew the pom pom tail onto the puppet.

No comments:
Post a Comment